HyperFluxCMS
Fast. Flexible. Free.
HyperFluxCMS
First configurations
First basic configurations of your site
The first step after installing your site is to perform the initial configuration. Here is where you will configure the site name, theme, etc.

After logging in to your site using the admin account or another with similar permissions, click on the "General Settings" option to open the configuration page.
Site Name:
The first thing is to enter your site or company name. This name will appear in all page titles and headers. For example, "St. Mary School", "Texas Steakhouse", or "Quiprocó City Hall"
Site Subtitle:
Then, enter a subtitle for the site, or the company's activity, or a short slogan, such as "Taking Care of You", "With love for your baby", "Meat and pasta", or "Everything for your home".
Copyright Information:
Here you will enter some copyright information for the site, images, and your posts in general. This text is normally displayed in the footer of each page. Example: "Copyright (c) 2020-2024, ACME Corporation."
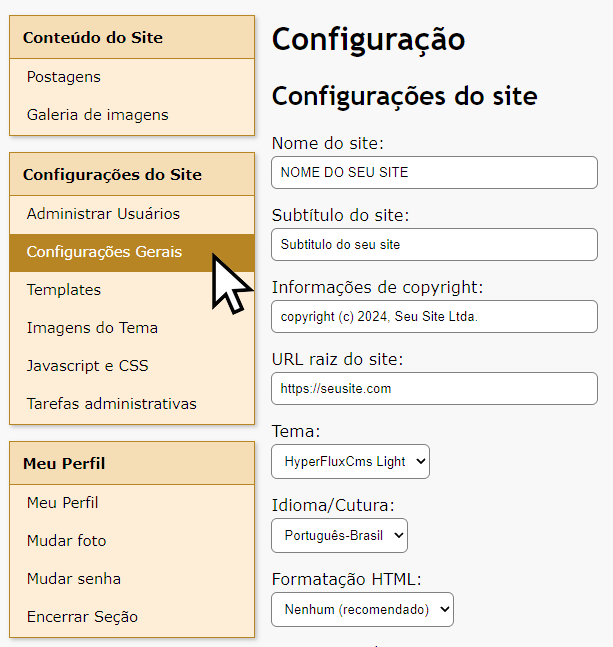
Site Root URL:
Then enter the definitive URL of your site, without including pages, just the site. For example, "https://sci.ind.br"
Theme:
Next, choose the theme for your site.
In the future, more themes should be available. You will even be able to install new themes while your site is already operating. But in the current version of HyperFluxCMS, you must choose from one of the few available themes.
When changing a theme, ALL pages of your site will automatically use the new theme. And if you don't like a theme, you can change to another one whenever you want, without affecting the text or images of already existing posts.
As a suggestion, use a DARK theme for sites that are about:
- Modern and technological things, such as programming, hacking, electronics, and video games.
- "Subversive", "underground" lifestyle, such as rock, tattoos, extreme sports.
For other themes, a light theme is usually more suitable. But it's your choice. Remember that you can switch between themes at any time.
Language/Culture:
Next, choose the main language of your site.
HTML Formatting:
Reserved for future use. Select the recommended option.
Home Page: Static or Dynamic?
The next step is to choose whether your site's home page (also called "landing page") will be static or dynamic.
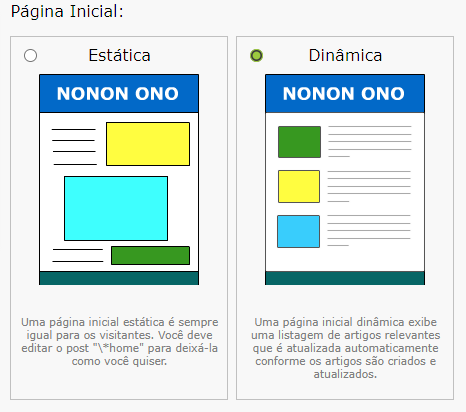
A Static Home Page will always appear the same until you or another authorized person makes changes. It is useful when you want to immediately convey to the visitor information about your main product or service and it should not be updated frequently. It is ideal for sites with few content pages and more focused on the visual aspect.
A Dynamic Home Page is automatically updated as you and authorized people publish new posts. It is useful when your site undergoes frequent updates. It is ideal for sites that have many content pages and are more focused on information and text.
As a general rule, use a STATIC home page for:
- Beauty salons;
- Accounting offices;
- Law offices;
- Engineering offices;
- Medical, dental, veterinary clinics and offices, etc;
- Companies and professionals focused on a single product or service;
- Political candidate pages;
Use a DYNAMIC home page for:
- Newspapers and news portals;
- Newsletters for schools, clubs, unions, associations, politicians, churches, parishes, universities, etc;
- Personal blogs;
- City halls and public agencies;
- Restaurants and salons that have frequent promotions and events;
- Industries and businesses with multiple products;
- Sites that have a blog with useful posts to attract an audience to your company;
These are general recommendations. You can choose between one model and another. You can even change your mind later, when your site is already in full operation.
Configuring email

This is the most complicated part for beginners. Now you will configure sending emails for when a visitor to your site sends a message using the contact form.
When the visitor fills out the form and clicks "Send", HyperFluxCMS creates an email with the data provided by the visitor and sends it to an email account, which the person responsible for the company or site will see and take appropriate action, whether forwarding to another person, personally responding to the user, or contacting them by another desirable method.
But for this, HyperFluxCMS needs some information about the server and the email account. There is no single way to obtain this data; each hosting provider has a different way of creating and managing email accounts, and this document does not provide that. You will need the following information. You may need to contact the company that hosts your site, or the site manager, or the web designer, or even your nephew who understands computers.
The information you will need is:
- The address of the email sending server (SMTP). Usually the server is hosted along with the site, but has some prefix (like smtp.mysite.com) or an IP address number (like 200.199.198.197);
- The port used to connect to the sending server: usually 465 or 587, but it could be 25 or, very rarely, another number;
- The login/username of an account created on this SMTP server. This account must have the permission to send emails;
- The password for that account to send emails;
- An email account that will RECEIVE the emails with the forms. It is recommended, but not mandatory, that it be an account created on the same server, on the same site. For example, "contact@yoursite.com". But it can be any other email account. It could be your personal GMail or Hotmail account;
Preferably, you should create (or ask to create) a specific email account for sending these forms. It is not mandatory, but it is highly recommended for two reasons: It will allow you to put it on a "white list", preventing emails from being mistaken for spam and accidentally deleted by an antivirus; and it prevents you from having to put login and password information for an account you use for other purposes in the site configuration.
It is also recommended to create/use an account on the site itself specifically for receiving forms for two reasons: Sending is much faster when the email leaves and enters the same server, and the chance of failing due to a connection drop or slowness is very small; Also, when you respond to the visitor, it will give them a much more professional experience if they receive the message from "contact@yoursite.com" or "support@yoursite.com" than one coming from "cutiecuddlylovess2@gmail.com".
Fill in the respective data on the configuration page, check if they are correct, and click "Submit". Wait for the response and if everything is as expected, your site will be configured.
To confirm, open a new tab and visit your site. Check if the title and subtitle are correct and if the theme and color scheme look good. Then go to the contact form, type something in the fields, and send it to see if everything went well and if you received the form in your email.
If there is any problem, go back to the Site Configuration and correct what is wrong. If everything is correct, your site is configured and you can go to the next step: Manage Users.
Favicon
Favicon helps visitors identify your site.
Favicon is an image that is usually automatically downloaded by the browser. It is a small image that is normally shown next to the page title in the browser's title bar, or in navigation tabs.
The icon is also used when the browser inserts a bookmark or creates shortcuts to your site.
Although most browsers accept Favicons in .PNG or .SVG format, HyperFluxCMS uses favicons in .ICO format. This format has the advantage of allowing several different sized images together in the same file.
If you already have a Favicon in another format, you can use some tool to convert it to .ICO format. There are several tools that do this online, without having to install anything on your computer.
The Favicon should normally be a simple, minimalist image, without many details, as it is usually displayed in a small size, and details would be lost or distorted.
After you have the Favicon file in .ICO format (usually favicon.ico), you can replace the default HyperFluxCMS favicon with yours.
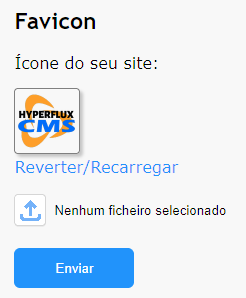
To do this, click "Select File" or a similar option. Choose the file on your computer and click Submit.