HyperFluxCMS
Fast. Flexible. Free.
HyperFluxCMS
HyperFluxCMS Installation
How to install HyperFluxCMS
Now that you understand HyperFluxCMS and have decided to install it, find out what you need to get started.
First of all, you will need to hire a WINDOWS hosting service that has the necessary resources. Review the section What are the requirements to install HyperFluxCMS?
You can hire any provider of your choice, as long as it meets all the requirements.
You will also need to learn how to upload the initial files and get the service online. This depends on each provider, and you must follow their instructions or ask for help from the provider's support.
Sirius Brasil has partnerships with resellers and can offer hosting plans compatible with HyperFluxCMS at very friendly prices. And we also do the installation and initial configuration of your site for you.
The steps from here on apply to hosting providers with the Plesk control panel and are illustrative only. Your hosting provider may be using another control panel, or a different version of Plesk, or a version in another language, which will most likely have other similar ways to achieve the same results.
IT IS NOT THE OBJECTIVE of this page or our team to provide support for Plesk or another control panel or the hosting provider. If you have any questions or difficulties, please contact your provider or seek a solution on Internet forums, or through AIs like ChatGPT or DeepSeek, or YouTube tutorials, or other means.
Support requests regarding installation and configuration sent to the HyperFluxCMS team will likely NOT BE ANSWERED.
Prerequisites
You will need:
1. Hire a compatible hosting service
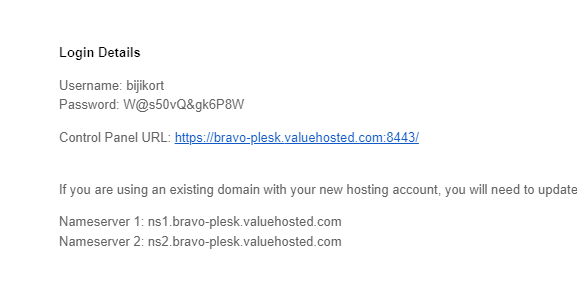
Choose a service suitable for your needs and budget. On this page we will NOT teach how to do this and we will assume that you have already hired a suitable provider. After making the payment, you should receive an email containing: A link to access the control panel; a username (login); and a password. Write them down. You will need them.
2. Have your domain (your .COM, .COM.BR, .NET, .ORG, etc name).
On this page we will NOT teach how to do this. We assume that you have already purchased your domain name.
3. Have the domain already configured and propagated (which can take up to 24 hours).
Again, on this page we will NOT teach how to configure domain servers and we will assume that this has already been done, either by you or by the provider you hired.
4. Have two email accounts configured
One email account to SEND the contact page forms and another to RECEIVE the forms. Again, on this page we will NOT teach how to create and configure email accounts, and we will assume that you already have both accounts and the necessary information: smtp server name, port, login, and password.
You may find some tutorials on how to do these configurations on the official HyperFluxCMS YouTube channel:
Or, if you prefer not to spend your time on this, you can leave all this heavy work to us by hiring a Premium Support package offered by us.
On this page we will teach how to install HyperFluxCMS using the Plesk control panel, the most popular among Windows servers.
If you followed steps 1 to 4, you should have:
- link to access the control panel;
- control panel username (login)
- control panel password
- an email account to receive emails
- login and password for that account
- a way to access that account (webmail or pop3 address)
- an email account to send emails
- login and password for that account
- smtp server address for sending emails
- port for sending emails (such as 25, 465, or 587)
- domain (.com, .com.br, .net., etc) already configured and propagated (accessible)
SCI Brasil has published some videos on YouTube showing the step-by-step installation and configuration of HyperFluxCMS. One of the videos also shows the step-by-step process for creating email accounts if they haven't been created yet.
See more at https://www.youtube.com/@scibrasil
Let's proceed.
You will also need:
5. The most up-to-date version of HyperFluxCMS, preferably downloaded from the official website. It will be a .zip file.
6. Decide what the main language/culture of the page will be. English? Portuguese? (at the time this document was written, only these two options were available, but in the future new options will be added).
With this in hand, it's time to start installing HyperFluxCMS.
Uploading files with Plesk
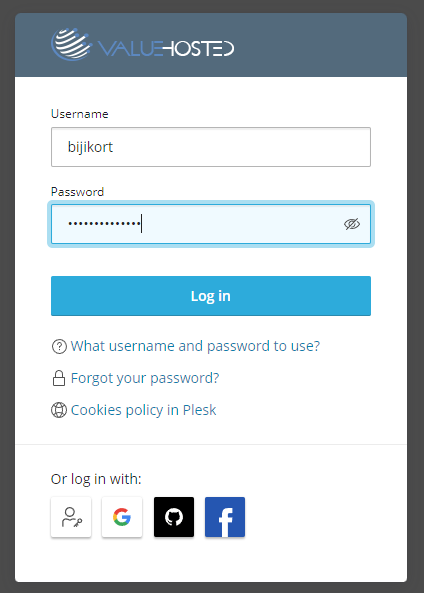
1. Open the browser and access the link provided by the hosting provider.
2. Log in using the login and password provided.
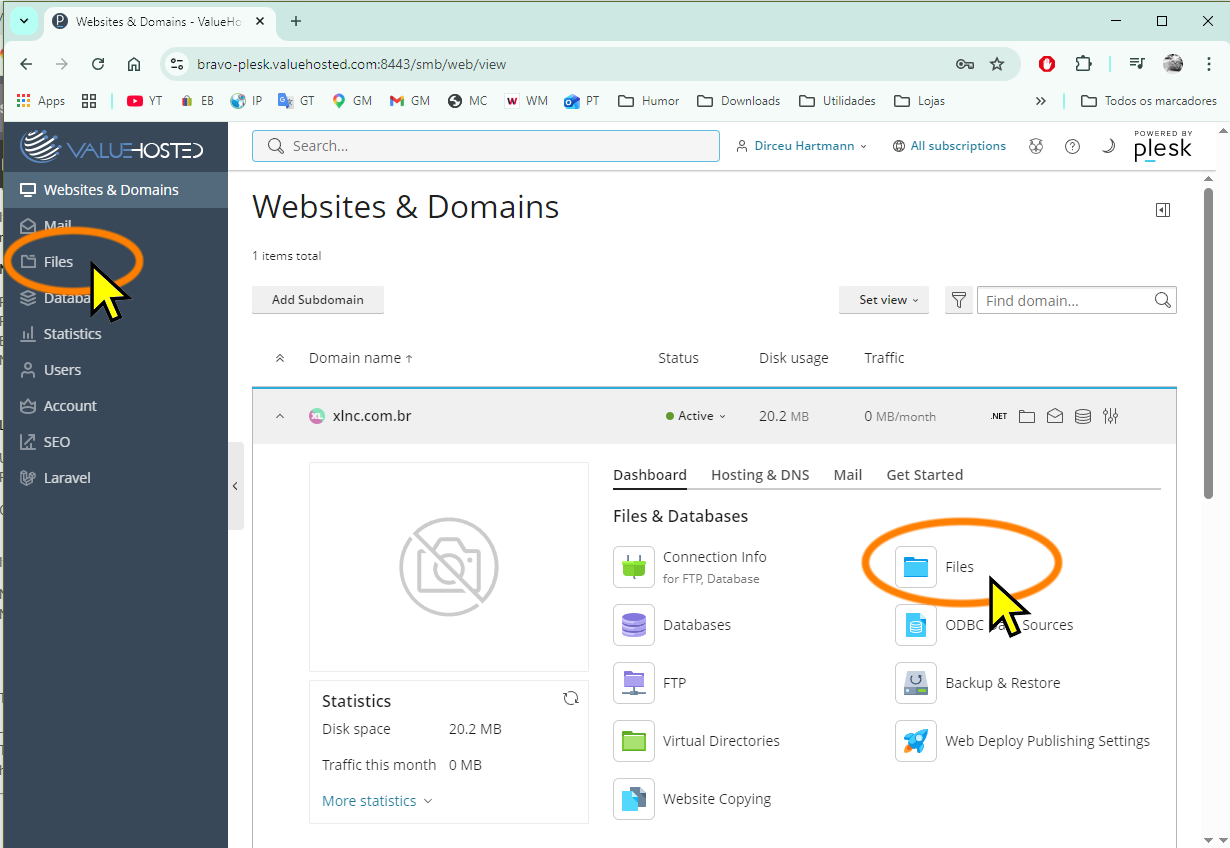
3. You will see the Plesk Control Panel. Look for the "Files" option in the main panel to access the file manager.
4. In the File Manager, navigate to Home Directory -> httpdocs
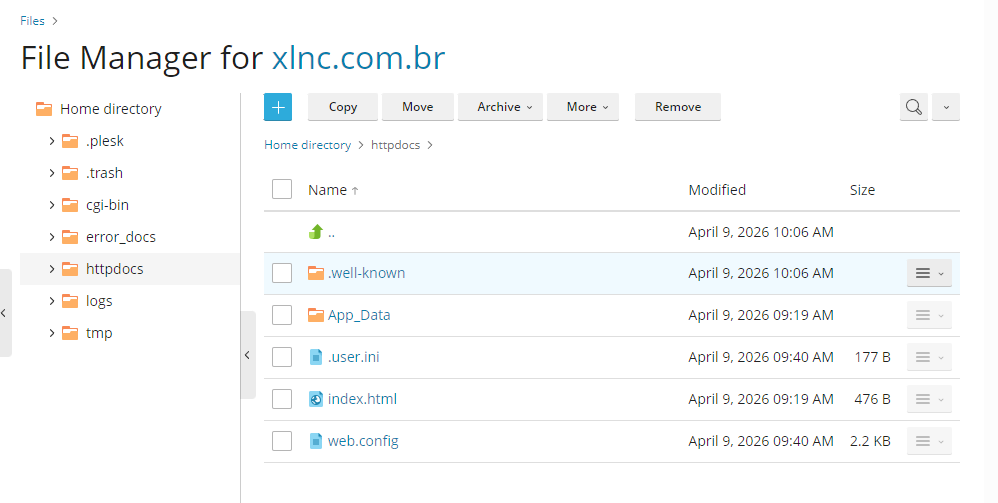
5. Then click (+) and Upload File
Select the .zip file containing the most recent version of HyperFluxCMS that you downloaded from the site and wait for the file upload to finish.
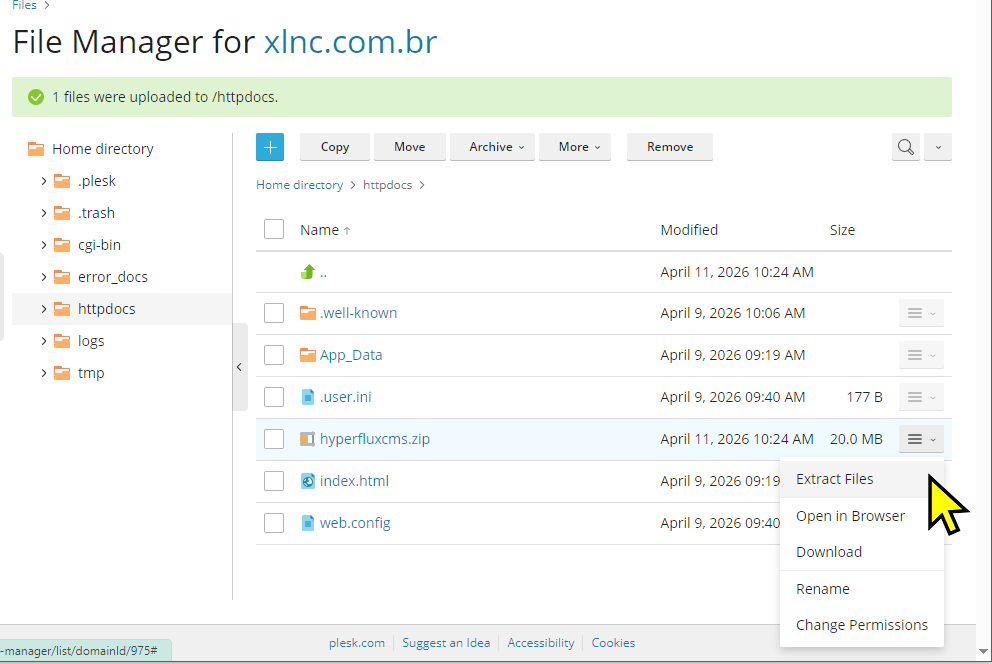
6. After the file has been uploaded, locate it in the list. Click the button to its right in the file manager and select the "Extract Files" option.
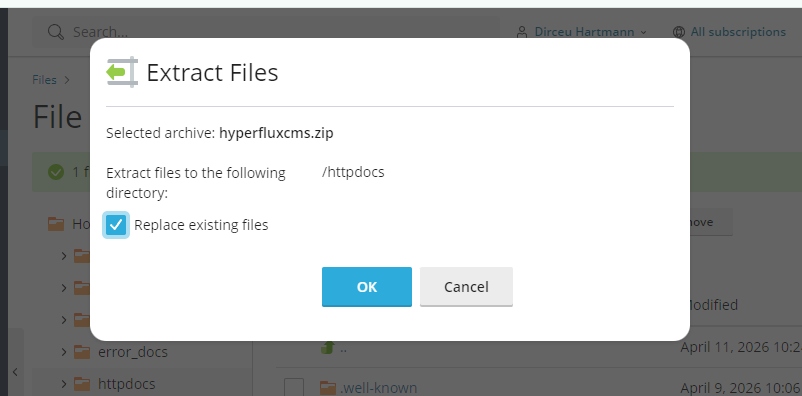
7. A confirmation request for extraction and whether to replace existing files may appear. Confirm.
8. Wait for the file extraction
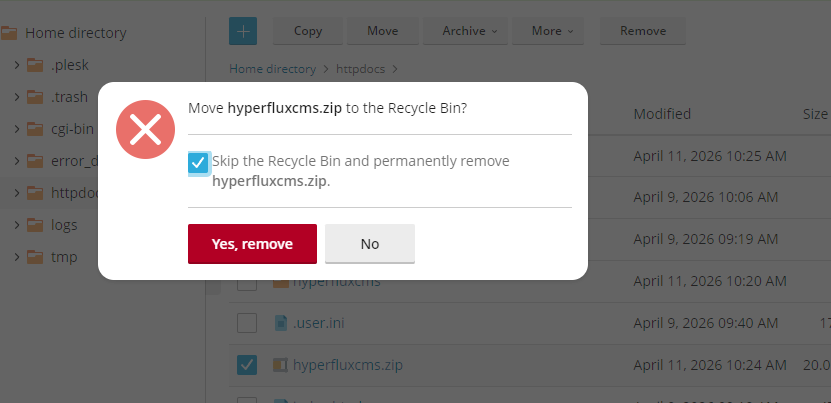
9. In a few seconds the file list will be updated and a new folder called hyperfluxcms will appear. You will no longer need the .zip file you uploaded, so you can delete it. Select it in the list and click Remove.
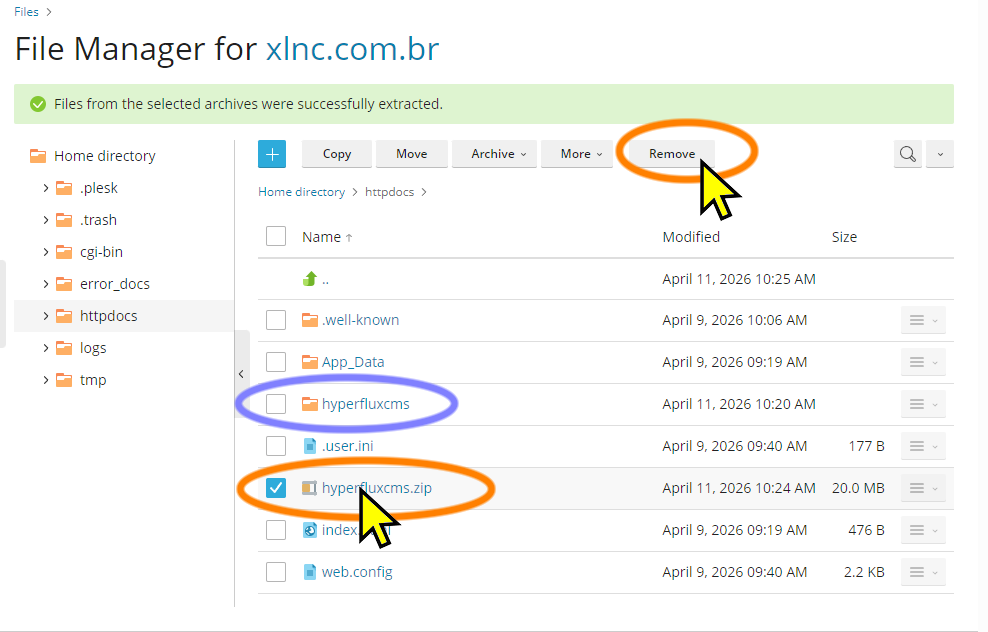
10. If asked for deletion confirmation, make sure you selected the correct file and confirm. You can leave the option checked to delete permanently without sending to the trash.
Managing Permissions
Now it is important to ensure that HyperFluxCMS will have write access to the folder where it stores site information and also to the image gallery.
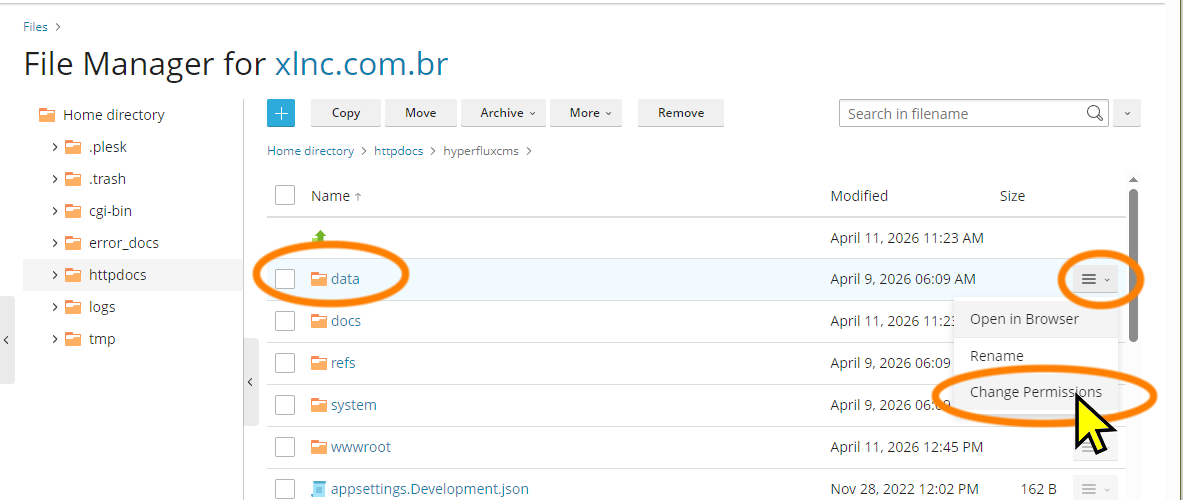
1. Still in the Plesk File Manager, click on the newly created hyperfluxcms folder and locate the "data" folder. Click the menu/button to the right and select "Change Permissions".
2. The screen with folder access permissions will appear. Click on the item "Application Pool Group" or similar and check the permissions.
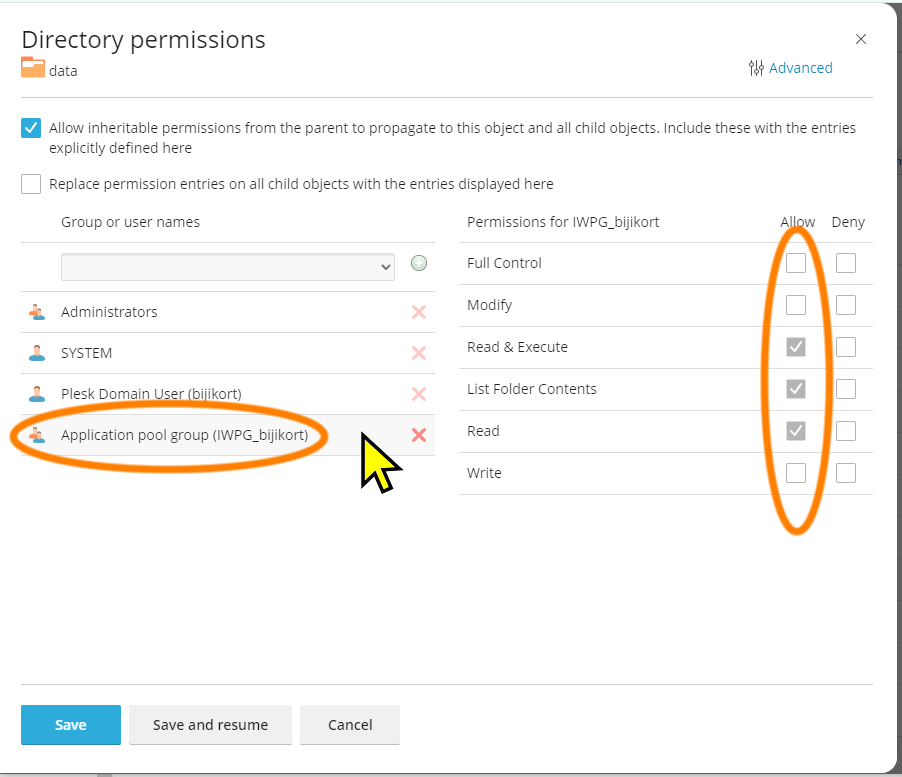
3. It is important that ALL permissions are checked as "Allow". If any are unchecked, check them and click Save.
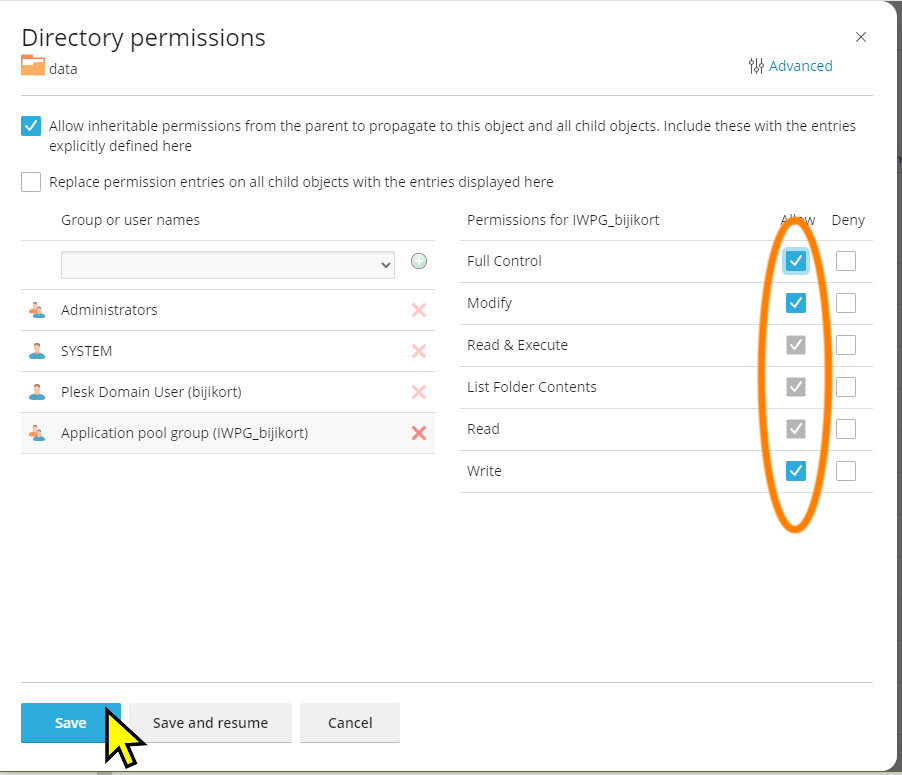
4. Repeat the same process of checking all permissions for the Application Pool Group in another folder called "wwwroot"
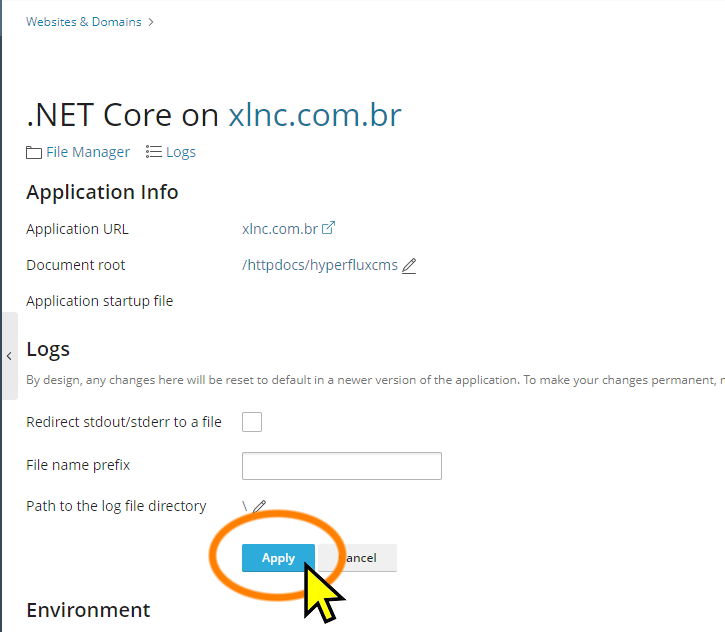
Telling Plesk which is the System folder
1. Return to the Plesk Control Panel by clicking on "Websites and Domains"
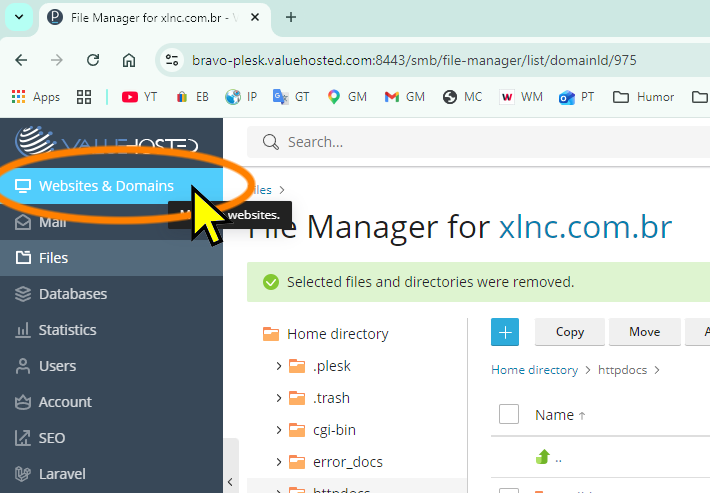
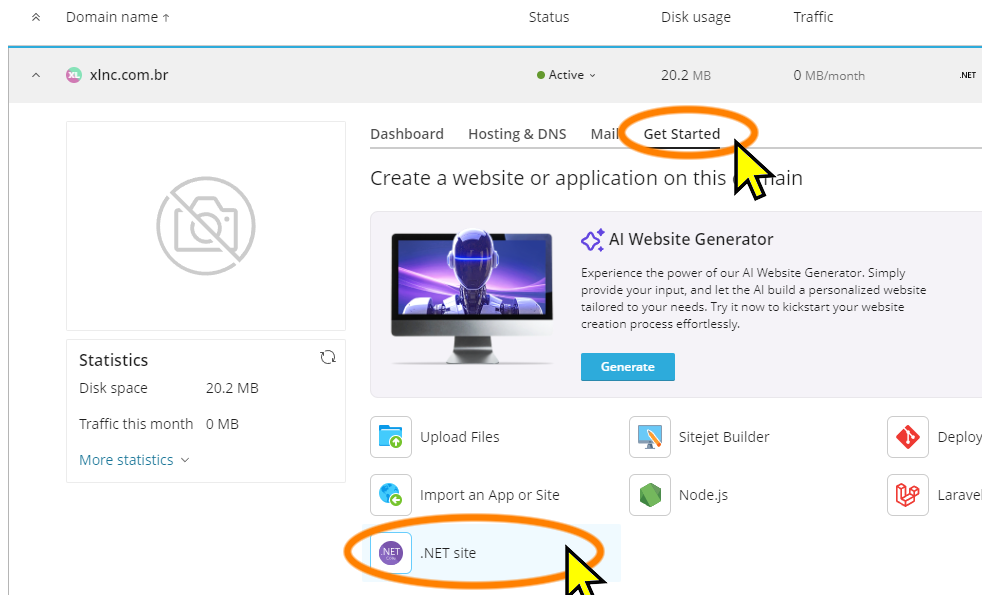
2. In Get Started, look for ".NET Site"
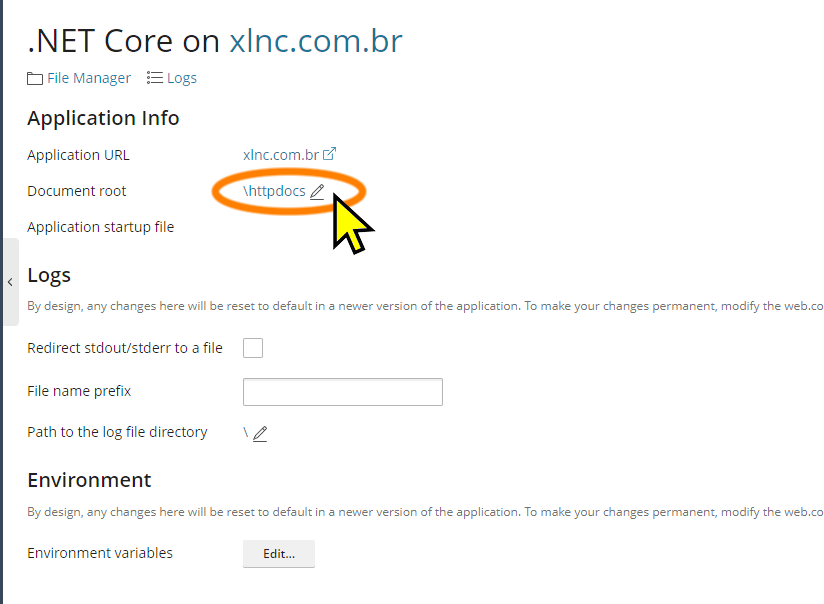
3. The .NET site configuration screen will appear. Click the edit icon next to "Document Root".
4. An option to browse to the new location that will be the site root will appear. Navigate to the httpdocs/hyperfluxcms folder. Select this folder.
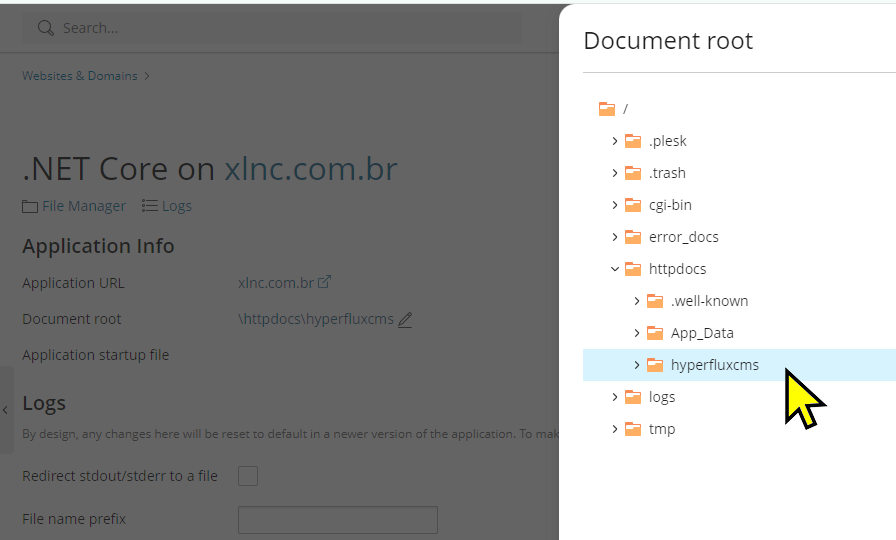
5. Click the "Apply" button. Wait. This may take several seconds.
Accessing the site to install
1. Now access the site through the browser, using the address (domain) you purchased. A screen like the one below should appear:
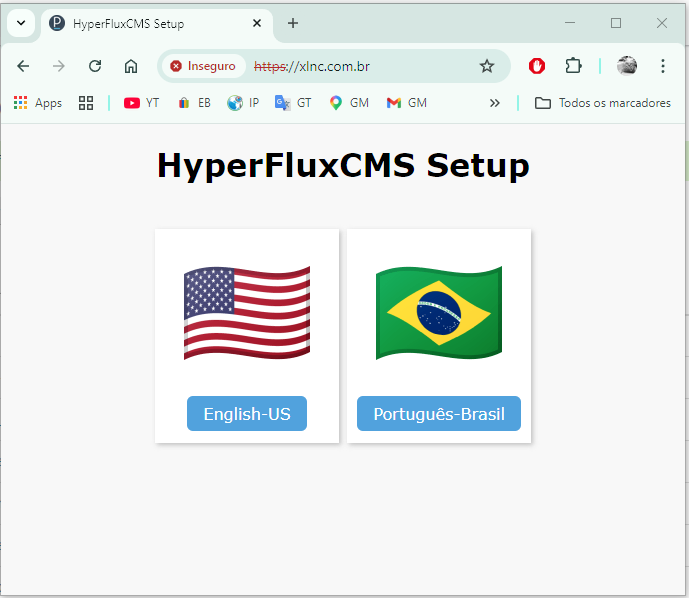
2. Select the desired language. Wait a few moments. HyperFluxCMS will be installed. In a few seconds, the screen will appear informing you of the installation success and a login and password to administer the site.

Write down the login and password. You will need them to configure the site.
Most common problems
Not secure connection
It is common for the screen below to appear when accessing the site:
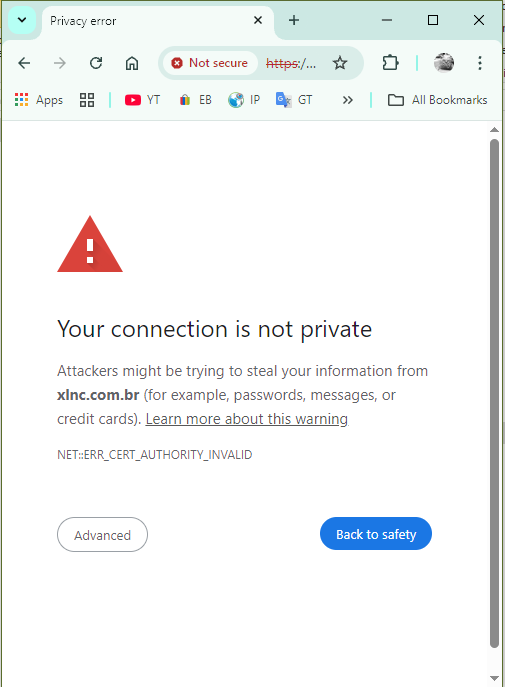
If it appears, it means there is no SSL certificate properly installed on the site. This is a problem WITH THE SITE, not with HyperFluxCMS. Contact your provider. Most providers offer certificates, some simple and free, others paid with additional features.
The fact that this message appears DOES NOT prevent you from continuing to use and install HyperFluxCMS. Click Advanced (or similar option) and then "Proceed to the site" (or similar option).
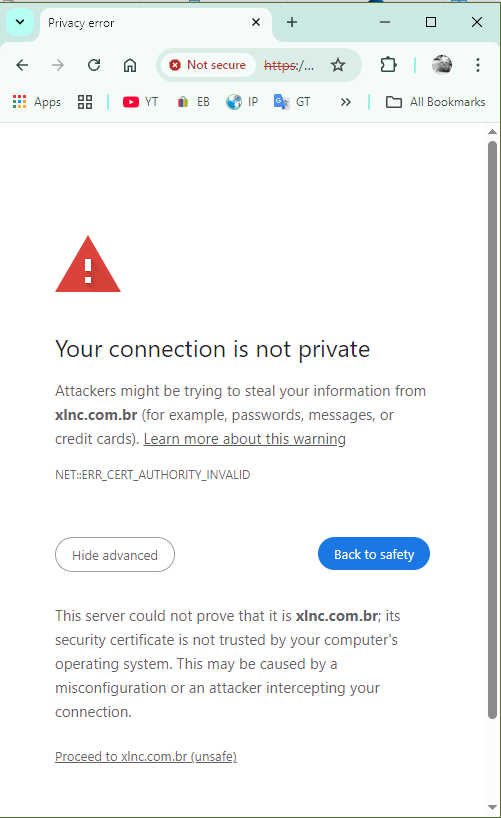
In this case, you can continue using, installing, and configuring the site without problems. But you should arrange an SSL certificate as soon as possible, as it may create a bad impression on your site visitors that your site is not secure.
Not secure connection (blocked)
In some cases, due to site configuration, the option to proceed to the site may not appear. This happens, for example, if the site is configured to only accept SSL connections or use the HSTS (HTTP Strict Transport Security) system.
This is a configuration problem WITH THE SITE, not with HyperFluxCMS. And it completely prevents access to the site until the problem is resolved, the configuration is changed, or a certificate is installed. Contact your hosting provider to resolve the problem.
Error 503: Service Unavailable
This error usually occurs when the IIS Application Pool is not running. To resolve this, access the Plesk Panel or Dashboard, go to "Hosting & DNS", look for "Application Pool" or "Dedicated IIS Application Pool for Website" and click.
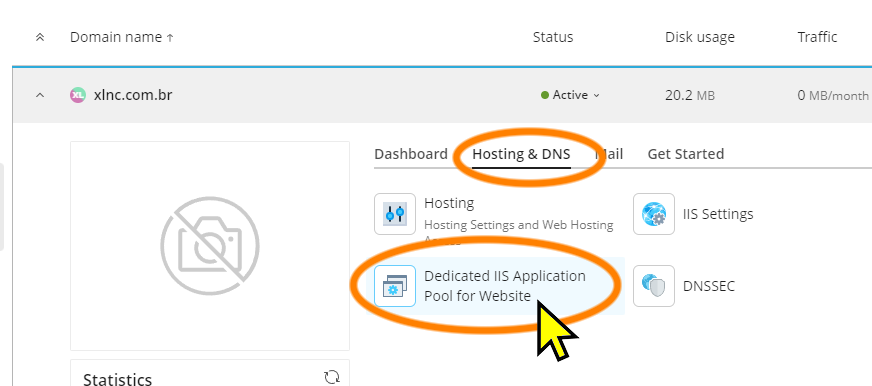
Then look for the "Start" option to start the service.
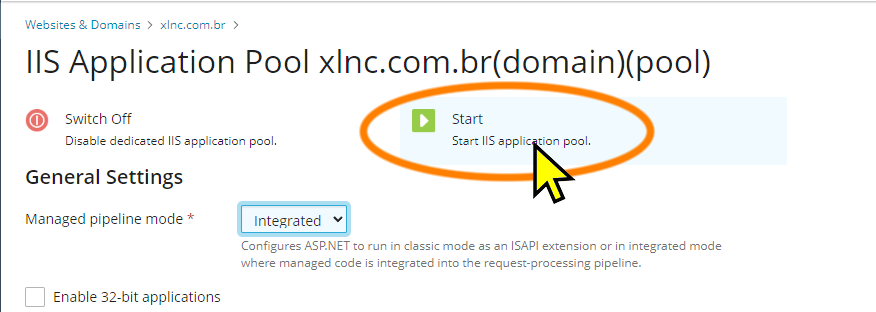
Then try accessing the site again. This time it should access normally.
Error 500: Server Error
It may happen that when accessing the site for the first time, instead of the screen with the language options to choose from, an error screen appears. Or, AFTER choosing the language, an error screen appears.
The main cause of this is when the HyperFluxCMS application does not have write permission in the folders it needs: data and wwwroot.
Go back to the part of this page that describes the step-by-step process for configuring permissions for these folders and check. If necessary, you can DELETE the "application pool group" user from the list and add it again, to ensure it has the necessary permissions in these folders.
Error sending email
You configured the email accounts correctly. You checked that they are active. You checked the server, port, login, and password. Even so, the "contact us" form says it was not possible to send the email.
This error can be caused when the email is configured to use secure connections (HTTPS, SSL, TLS) and the site does not yet have a valid certificate. If the port used is 587 or 465, and your site does not yet have a valid SSL certificate, this is the problem.
Acquire an SSL certificate. Most providers sell them or offer a free one. You may need one that offers a wildcard domain (*.yoursite.com) to also work for email.
If your site ALREADY HAS a certificate, but it was installed recently, it may take up to 24 hours to propagate. In that case, wait and try again in a few hours or tomorrow. The problem will likely disappear on its own when the certificate propagates.
Error sending email - VALUEHOSTED Site
Specifically for THIS hosting provider, we found a small bug. This problem was noticed in the week this page was written. By the time you are reading this, it may have already been fixed.
When we click on Email Client Configuration -> Manual Configuration, the site informs us to use the address email-bravo-plesk.Valuehosted.com as the email server. When using it, the system CANNOT send emails. This is because their SSL certificate is for another domain. It is THEIR error, not HyperFluxCMS's.
The address you should enter in the SMTP Server field is: mail.<your-site-name>. For example, mail.your-site.com
Other hosting providers may also have the same problem. If so, try using in the SMTP Server Address:
your-site, such as your-site.com
mail.your-site, such as mail.your-site.com
smtp.your-site, such as smtp.mail.your-site.com
Updating HyperFluxCMS
To UPDATE HyperFluxCMS to a newer version, the steps are very similar to the installation.
1. Upload the .zip file with the updated binaries to the httpdocs folder.
2. Stop the IIS Application Pool. In Plesk, under Websites and Domains -> Websites and Domains -> Hosting & DNS -> Application Pool -> Stop
3. Return to the File Manager
4. Extract the contents of the HyperFluxCMS file. Check the Replace Files option. DO NOT DELETE the HyperFluxCMS folder; inside it are the site data, configuration, gallery, posts, etc. Just extract the zip contents and let it replace only the binaries, leaving the data files untouched. You may also prefer to back up the gallery and data folders for greater security.
5. Return to the Application Pool options and start the service again.
Note that when doing an UPDATE instead of a new installation, it was not necessary to adjust folder permissions, choose language, or other settings; it is assumed that these things were already configured previously and therefore should be reused.
The update, done this way, preserves previous data files, as well as gallery content and settings.
After Installing
After installing, the site customization stage begins. You will need:
1. A title for your site. It can be the name of the company, project, person, campaign, etc. Such as "Mendonça & Ferreira", "Adopt a Tree", "City Journal", etc.
2. Optional - A subtitle for the site. (Such as "associated attorneys", "Making a difference", "Taking care of you", etc;
3. Optional - A short phrase with copyright information, such as "copyright 2026, EonTec"
4. Optional - An image with the company or project logo, preferably in transparent PNG format. It does not need to be very high resolution. A height of 400 pixels is usually more than enough.
5. Optional - An image with the company or project logo, preferably in transparent PNG format, of reduced size, preferably between 40 and 48 pixels in height.
6. Optional - An image for the page header background. Preferably in JPG format, much wider than tall. It does not need to be very high resolution. A size of 1200x300 pixels is more than enough. It can be an abstract image. Preferably blurred. It should be a color that contrasts well with the page header text to not hinder reading.
7. Optional - An image for the page footer background. Preferably in JPG format, much wider than tall. It does not need to be very high resolution. A size of 1200x300 pixels is more than enough. It can be an abstract image. Preferably blurred. It should be a color that contrasts well with the page footer text to not hinder reading.
8. Optional - An image in .ico format to be the "Favicon" of your site. This icon appears in the browser tabs.
Proceed with the site configuration according to the instructions, and your site will be ready.
See now the next steps to configure the site and start using HyperFluxCMS
Basic Settings:
Site Appearance:
Publishing Content:
Writing Content:
- Accentuation
- Lines and Paragraphs
- Special Symbols
- Special Symbols in HyperLite
- Automatic Line Breaks in HTML
- Avoiding Automatic Line Breaks
- Using HTML in HyperFluxCMS
- Using HyperCode in HyperFluxCMS
- Using HyperLite in HyperFluxCMS
Migrating the site
You may be installing HyperFluxCMS on a new server after having installed, used, configured, and added content on another site or server.
To do this, follow the installation steps described above.
Additionally, you must also follow two additional steps:
Step 1: inside the data folder, copy the hyperfluxcms.db file obtained from the previous site.
Step 2: inside the HyperFluxCMS/wwwroot/Gallery folder, copy the previously saved gallery files. Do the same for the subfolders. It is not necessary to do this for the thumbs folder, but there is no problem if you want to.
Installing themes
You may be installing some Theme for HyperFluxCMS that is not one of the ones that come by default in the system.
To do this, open the HyperFluxCMS folder, then wwwroot, then themes.
Copy the folder containing the theme files into the themes folder, uploading the files one by one or sending the .zip file, extracting the file, and deleting the .zip (recommended method)
Make sure it was extracted correctly. It should have created its own folder, and inside this folder there should be a file called themename.txt.
There will likely also be a file called theme.css and possibly theme.js and a folder called img.
If this does not happen, then the folder was created one level above or below what is required. Delete the newly uploaded files and try again, taking care to place the files and folders at the correct level, which is /wwwroot/themes/theme-name/