HyperFluxCMS
Fast. Flexible. Free.
HyperFluxCMS
Posting articles
How to create and edit articles on your website
After everything is configured, it's time to populate your site with the content that really matters. See how.

After finishing the part of installing and configuring HyperFluxCMS, it's time to make your site fulfill the purpose for which it was created: to have content for visitors to learn about your products, your services, and other information you wish to share.
After logging in to your account on your site, the "Site Content" group should appear on the left side of the screen. Click on "Posts".
A list with the site's posts will appear, like the one below.
Post list
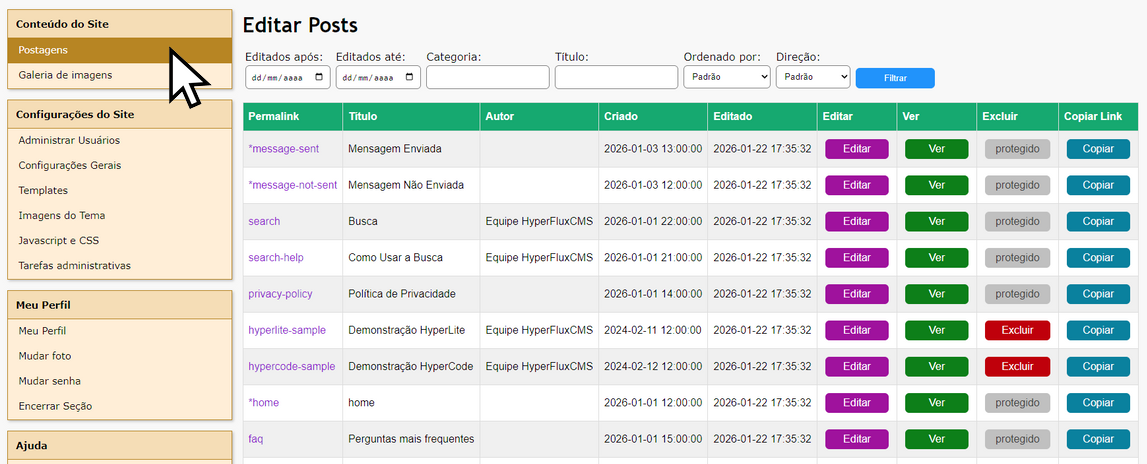
Permalink indicates the link that will be used to access the post on your site. For example, if the permalink is "products-and-services", the page will be accessed via "yoursite.com/products-and-services". Clicking on the "permalink" in this list is equivalent to clicking the "Edit" button.
Title is the post title. It will be displayed prominently at the beginning of the page and also on the site's search pages and in other listings. It will also be the text displayed when the page link is shared on social media and when it is displayed on search engines like Google.
Author is the name of the user who originally created the post.
Created shows the date and time the post was originally created.
Edited shows the most recent date and time the post was modified/updated/saved.
The Edit button opens the post for editing, as will be explained later.
The View button opens the post for viewing in another browser window or tab. It will show what the post looks like in its final form that your site visitor will see.
The Delete button deletes the post from the site.
The Copy Link button copies the link to the post to the clipboard, including "https://" and the site name. It is useful when you want to share the link on social media, emails, or conversations.
If the number of posts on the site does not fit on a single page of the list, buttons like "Next" and/or "Previous" will appear at the bottom of the list, where you can go to another page of the list.
Why don't all posts appear to me?
For security reasons, only the posts you have editing access to appear in your list.
Imagine, for example, a small newspaper that has a journalist who handles politics, another who handles the social column, another who handles the police beat, and an editor-in-chief.
It doesn't make sense, and is even risky, to let the one who handles the social column delete or edit a post written by the police beat journalist and vice versa. On the other hand, it makes sense for the editor-in-chief to be able to delete or edit posts written by both.
Therefore, the post listing is restricted according to the following criteria:
For Editor-in-Chief, those users configured with permission to "Edit and Delete posts from other users", all site posts are displayed.
For other users, only posts that meet the following criteria are shown:
- Were created by the user currently logged in; or
- Have no owner yet. These are posts created automatically during HyperFluxCMS installation that have not yet been edited or deleted.
Protection against accidental deletion
Once a post has been deleted, it is lost forever and cannot be recovered. Therefore, it is recommended to protect posts against accidental deletion.
When writing or editing a post, check the "Protect against accidental deletion" option.
This will cause the "Delete" button to appear disabled in the post listing, making it impossible to delete it.
To be able to delete a post, you must first edit the post, uncheck the "Protect against accidental deletion" option, then return to the listing and the delete button will be enabled, allowing deletion.
Filtering posts
Your site may have dozens or even many thousands of posts. Finding a specific post in the list can be laborious.
To make it easier to locate a specific post, or to list posts by criteria such as date, see that at the top of the listing there are controls to filter the list.

You can fill in any one, or more than one, or all of the criteria offered and click "Filter". The list will be updated to show only the posts that meet ALL the requirements.
For example, in a newspaper, to display only posts that belong to the "world" category, created or last edited in February 2025, and that contain the word "germany" in the title, select the respective filters.
You can also choose the order in which posts will be displayed. For example, you can have them appear sorted by Edit Date, in DESCENDING order, meaning the MOST RECENT will appear FIRST in the list.
Note that post creation is treated as if it were the first edition. Therefore, even if the post was created only once and never modified, in this case Edit Date is a valid criterion for filtering and sorting and will be the same as Creation Date.
Editing posts
After finding the post you want to edit or update in the list, click on the post's permalink or the "Edit" button.
A page will open to edit the post content or change its settings.
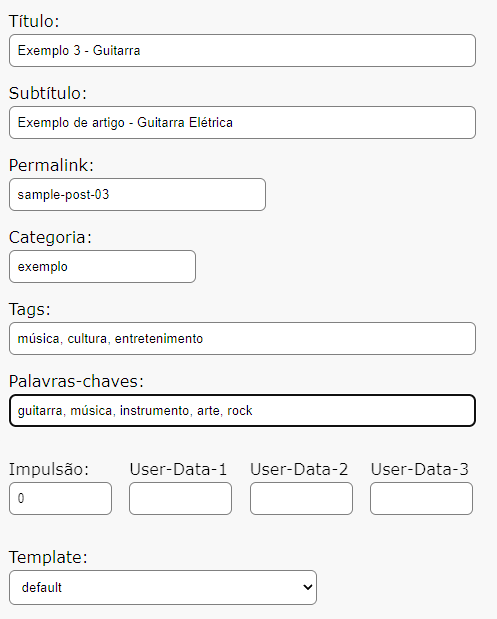
Of the fields listed below, only Title, Permalink, and Post Content are strictly mandatory. The others are optional.
Title is the post title. It will be displayed prominently at the beginning of the page and also on the site's search pages and in other listings. It will also be the text displayed when the page link is shared on social media and when it is displayed on search sites like Google. It should be very brief, with few words.
Subtitle is the post subtitle. It is usually also displayed prominently, but less so than the title, in posts. It is usually used to complement or explain the title. For example, a post with the title "Products" might contain the subtitle "Learn about the products offered by ACME Corporation".
Permalink indicates the link that will be used to access the post on your site. For example, if the permalink is "products-and-services", the page will be accessed via "yoursite.com/products-and-services".
The Permalink can only contain numbers, unaccented letters (preferably all lowercase), and the characters _ and .. Do not use spaces, accented letters, or other symbols. It is not possible to have two posts with the same permalink. If a post needs to have a permalink that is in use by another post, the other post must be deleted or edited to change the permalink.
Once the post has been created, it is recommended not to change the permalink unless absolutely necessary. The permalink is used by other site posts and pages to access the post. It is also used by search engines like Google.
It is also used when the post has been shared on social media by you or a visitor. Changing a permalink that is already in use will cause any access to it, whether from inside or outside the site, to end up showing a different page or a "Page not found" error.
Category is the post category. It will be used to help place the page in a good position in the site search, or to allow the user to find the page by subject, or to show the page in a category listing. It can be any text you want.
But to properly fulfill its function, it is recommended that you limit the variety of "categories" on your site, and fit each post into one of them rather than creating many.
To be able to use a wide variety, more specific or even unique to the page, it is better to use the "Tags" and "Keywords" properties.
Tags indicates a set of "labels" that indicate the main subjects covered in the post. You can specify more than one, separated by commas. You can also use expressions with more than one word, such as "web site" or "electric shaver".
It is not necessary to use quotes. Just write the expressions, and separate words and expressions using commas.
Tags are also used by the HyperFluxCMS search system to locate a page by tag.
Tags also allow you to automatically list the pages on your site that contain the indicated word in the address. For example, when opening the address "yoursite.com/tag/product", HyperFluxCMS will show a list of posts that contain the tag "product".
It is suggested to use 2 to 4 tags per post.
Keywords indicates keywords that indicate the main subjects covered in the post. You can specify more than one, separated by commas. You can also use expressions with more than one word, such as "web site" or "electric shaver".
It is not necessary to use quotes. Just write the expressions, and separate words and expressions using commas.
Keywords are also used by the HyperFluxCMS search system to locate a page by keyword. A good choice of keywords can also help place your site in a better position in search engine responses.
Keywords also appear in the <keywords> tag of the page Header in the generated HTML, and can be used by search sites to index this post.
It is suggested to use 3 to 10 keywords per post.
Differences between Tags and Keywords
- In the site search system, HyperFluxCMS considers greater relevance in Tags than in keywords. If a word is being searched for and is found in two posts, one as a tag and the other as a keyword, and all other sorting criteria are tied, the post with the word in the Tag is displayed first.
- Tags can be used to list posts by Tag on the site. Keywords cannot.
- Tags do not appear in the HTML file and are not used by search systems external to your site. Keywords do.
Boost is a number you can provide to force the page to have higher priority or relevance in site search results. If you have a post that you want to appear before similar ones in site searches, enter a number greater than zero. On the other hand, if you prefer, you can decrease its relevance in searches using a negative value.
For common pages, it is recommended to leave it at 0 so that the page appears in the fair position in searches. Use this for pages where it is truly important that these pages disregard the natural search order.
If you are going to use it, it is recommended to use values between -20000 and 20000. Very small values (large negative values) may cause the page to almost never appear in search. Very large values may cause the page to appear in searches that do not respect the criteria chosen for the search, causing frustration and irritation and producing the opposite of the desired effect on the visitor.
User-Data-1, User-Data-2, and User-Data-3 are numbers that can be used in future versions of HyperFluxCMS. It is recommended to leave them at zero.
Template indicates the template to be used when displaying the post. It must be one of the top-level templates configured on the site.
For example, some pages may use a template with sidebars, header, and footer, while other pages are more suitable to be shown on a screen with few distractions and greater usable space.
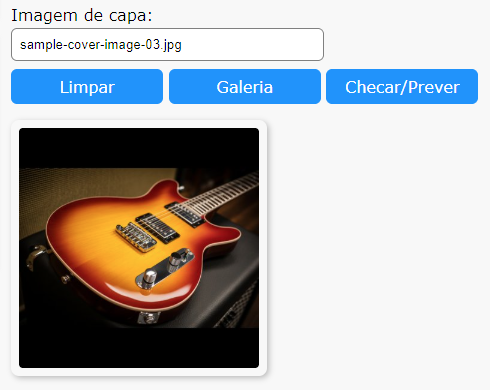
Cover Image allows you to insert a cover image for the post. It must be one of the images already uploaded to the Gallery.
Clear deletes the name of the cover image and leaves the post without any one.
Gallery opens the gallery to view available images or upload new ones. You can use the "copy name" option on the image to copy the name to the clipboard and use it here without risk of typos.
Check/Preview verifies if the entered name is correct, if an image with that name exists in the gallery, and if so, it will be displayed in the frame.
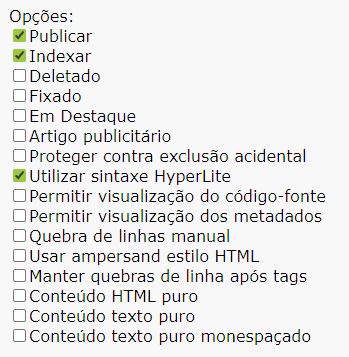
Options indicate a series of post characteristics:
- Publish - if checked, the page will be published. Otherwise, it will be hidden. Useful when you are editing a post that is still incomplete and you don't want it to be read by site visitors. It can also be useful to temporarily hide, without deleting, a post that is under review.
- Index - if checked, the page can have its data used for the site's search and indexing system. If unchecked, the page will not be indexed and will not appear in searches, but unlike "Deleted" or "Published", it does not prevent it from being accessible by other means, such as a direct link. Note that this only applies to the site's own search system, not to external systems like Google.
- Deleted - indicates that the page is marked as deleted. It is useful if you need to make a page invisible and inaccessible but you don't want or cannot delete it permanently because you might want it to become visible again one day. For example, pages that are under review due to suspicion of containing incorrect information that needs to be reviewed.
- Pinned - indicates that the page is marked as pinned. It can normally be used to increase the chance that a page always appears on the site's home page (subject to other conditions).
- Featured - Increases the post's score so that it appears in a better position in the site's search and listing system.
- Advertising article - Informs that the post has an advertising nature. Improves its position in simple score search.
- Protect against accidental deletion - indicates that the post is protected against accidental deletion
- Use HyperLite syntax - indicates that the page will use HyperLite syntax, so symbols like * and / must be treated specially. If used in the post code, they must be escaped. See more at Using HyperLite and Special Symbols in HyperLite.
- Allow source code viewing - Allows visitors to access the original source code of the post. Leave disabled. It is only useful on sites that are, for example, courses and tutorials on using HyperFluxCMS, like this page you are reading. Note that this refers to the source code written in Post Content, written by you as text and/or HyperCode and/or HyperLite and/or HTML. This does not prevent the visitor from seeing the generated HTML source code that is automatically generated by HyperFluxCMS when it compiles the post.
- Allow metadata viewing - Allows visitors to access post metadata. Only has effect if Allow source code viewing is also checked. Leave disabled. It is only useful on sites that are, for example, courses and tutorials on using HyperFluxCMS, like this page you are reading.
- Manual line breaks - disables the default HyperFluxCMS line break and paragraph algorithm. Line breaks must be inserted manually using HTML or HyperCode tags, such as <p>, <br>, [blank], etc. See more at Lines and Paragraphs, Automatic Line Breaks in HTML and Avoiding Automatic Line Breaks.
- Use HTML style ampersand - disables the algorithm that converts & into & and uses it in the standard HTML way, indicating the start of an HTML Entity. It should normally be used if you are importing or pasting content from a pre-written HTML page. In other cases, leave unchecked.
- Keep line breaks after tags - Normally the HyperFluxCMS compiler ignores line breaks after a HyperCode or HTML tag, until it finds another HTML or HyperCode tag or the beginning of a line of text. If this option is checked, line breaks after tags are understood as part of text formatting. It should normally only be true in special cases where the page content was imported/pasted from HTML and the site appearance does not match expectations, with blank lines in unwanted places. In other cases, leave unchecked.
- Plain HTML content - Indicates that the post content is written in plain HTML. No processing is done by HyperFluxCMS. It is not allowed to use variables, HyperCode Tags, or HyperLite formatting in the content; if used, they will be displayed as written, without processing. No effect in the current version of HyperFluxCMS. Reserved for future use.
- Plain text content - Indicates that the post content is written in plain text. No processing is done by HyperFluxCMS. It is not allowed to use variables, HyperCode Tags, HTML, or HyperLite formatting in the content; if used, they will be displayed as written, without processing. The system's default variable-spacing font will be used. No effect in the current version of HyperFluxCMS. Reserved for future use.
- Monospaced plain text content - Same as Plain text content. The difference is that by default, the text is displayed in a monospaced font, more suitable for displaying code.
Summary - type a short text there with a summary or introduction of the post or an explanation of what subject is covered in it. The Summary will appear in site searches, may appear on the home page, and will possibly appear in Search Engine searches like Google.
It should be text that arouses the reader's interest or makes them quickly realize whether the post contains the information they are looking for.
Type a short text but not too short. One to five sentences. Use only text, without HTML, HyperCode, or HyperLite, as this can confuse indexing and search algorithms, site appearance, and have unexpected results.
Post Content - Type the body content of the post there. See below.
After finishing creating or modifying the post, click Submit. The post will be sent to the system, which will perform verification and compilation, and if everything is correct, the post will be immediately available to be viewed.
Post content
The post content is where you will type the full body content of the post you are writing.
For short posts, you can use purely text. For longer posts, to make them less tiring and more attractive, use one or more of the Markup Languages supported by HyperFluxCMS to decorate and illustrate it with images, headings, links, tables, etc.
Normally you won't need any special concern with lines and paragraphs. HyperFluxCMS does this automatically for you unless you explicitly prefer otherwise.
See Lines and Paragraphs, Automatic Line Breaks in HTML, and Avoiding Automatic Line Breaks.
Also, normally you don't need to worry about accentuation. HyperFluxCMS handles this automatically in a satisfactory way most of the time. See Accentuation.
If you are using HyperLite or HyperCode, it performs some checks, and in case of error, it does not compile the page and you need to go back to edit it, correct the problems, and try to submit again until it is correct and can be properly compiled.
See more at How HyperFluxCMS works
For a post written in HyperLite or HyperCode to be accepted and compiled by HyperFluxCMS, several syntax and semantic rules must be followed.
- All opening tags must be closed. For example, if a post has the [b] tag to indicate a bold section, somewhere after it there must be the [/b] tag that indicates the end of the bold section.
- Only a tag that was currently open can be closed. If a closing tag (e.g., [/b]) is found without a corresponding opening tag (e.g., [b]) before it that has not yet been closed, that is an error.
- Nested tags must be closed in the reverse order from which they were opened. For example, start bold -> start italic -> start underline -> end underline -> end italic -> end bold.
- In addition to HyperCode tags, these rules also apply to HyperLite markup. Bold markup started with * must end with a corresponding * tag, following HyperLite criteria.
- Each HyperCode tag must be one of the tags supported by the current version of HyperFluxCMS. A tag with a typo prevents the code from compiling.
- Each HyperCode tag may have its own rules, and if they are violated, they may prevent the code from compiling. For example, the template tag must provide an existing template name, or they may cause the page to behave unexpectedly.
- Symbols like [, <, >, ] that are being used as text instead of tag markup and that are not properly escaped are considered syntax errors that prevent compilation.
- Tags or quotes (within tags) that are not closed are considered syntax errors that prevent compilation.
Additionally, other problems not described above may cause compilation errors. Typically, the error page will show details about what error prevented compilation. Review the code, try to locate and correct the error, and try to submit again.
HyperFluxCMS does not perform syntax and semantic verification of entire HTML snippets and posts, but even so, some HTML errors can prevent the post from compiling, for example, an HTML tag that lacks the corresponding closing tag, such as <b> without </b>.
Creating a new post
To create a new post, go to the bottom of the listing page and click "Create New".
A page will open for creating a new post.
Follow the same steps described above for editing a post.
Deleting a post
To delete a post, click the respective "Delete" button in the post list.
If the button is disabled and has the text "protected", it means the post is protected against accidental deletion. Edit the post and disable this option to proceed.
Remember that once deleted, it cannot be recovered. Instead, you might prefer to change the post's properties to make it invisible/unpublished, until you are sure that it really needs to be completely and irreversibly exterminated.